
To make “fried” ice cream without the deep fryer mess, start by shaping and freezing the ice cream into firm balls. Coat them with crushed cookies, nuts, or cereals, then freeze again to set the shell. Instead of frying, quickly brown the coating with a culinary torch or broiler, sealing in the cold center and creating a crispy exterior. This simple method keeps your kitchen clean and avoids hot oil spills—discover more tips to perfect your treat.
Key Takeaways
- Use a hot, non-fat method like broiling or a culinary torch to crisp the coating without deep frying.
- Freeze coated ice cream balls thoroughly before heating to prevent melting and ensure crispness.
- Select sturdy coatings such as crushed cookies or nuts that crisp well when briefly heated.
- Briefly brown the coating with a torch or under a broiler for a crispy exterior without oil splatters.
- Keep the ice cream cold until ready to serve, and add toppings afterward for a clean, mess-free presentation.
Preparing the Ice Cream Balls for Freezing
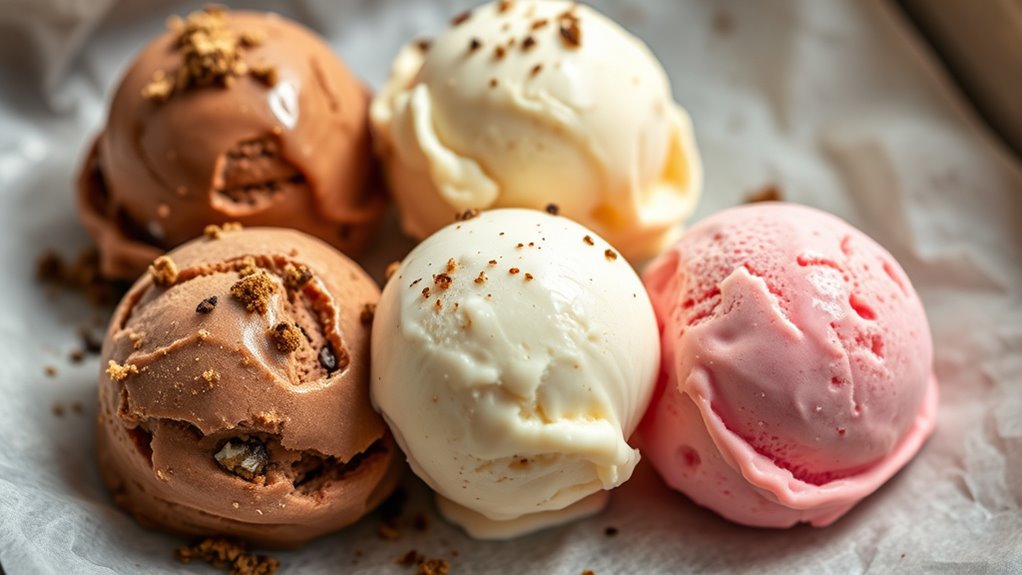
To guarantee your fried ice cream turns out perfectly, start by shaping the ice cream into firm, evenly-sized balls. Choose your favorite ice cream flavor—vanilla, chocolate, or anything else—and scoop it into portions using an ice cream scoop. Roll each scoop gently between your palms to create smooth, compact spheres. Next, prepare your coating ingredients, such as crushed cookies, cereal, or chopped nuts, to add texture later. Place the formed ice cream balls on a parchment-lined tray and freeze them for at least 2 hours or until completely firm. Freezing ensures they won’t melt too quickly when coated and heated later. Properly prepared and frozen, your ice cream balls will hold their shape and provide a satisfying, creamy center in your fried treat. Incorporating proper freezing techniques helps maintain the structure and quality of the ice cream during cooking.
Creating a Crispy Coating With Crunchy Mixes
Once your ice cream balls are firmly frozen, it’s time to craft a crispy coating that adds both texture and flavor. Start by selecting your crunchy mix, like crushed cookies, cereal, or nuts, which serve as coating alternatives. For flavor variations, consider adding spices such as cinnamon or cocoa powder to your crumb mixture, or mixing in shredded coconut for extra richness. Dip the frozen balls into beaten egg or milk, then roll them in your chosen crunchy mix, pressing gently to ensure the coating sticks well. For an extra crisp, you can double-dip by adding a second layer of coating after the first. This approach guarantees a deliciously crunchy exterior that complements the creamy ice cream inside. Incorporating unique and wicked planters to display your homemade ice cream treats can elevate your presentation and impress guests.
Freezing the Coated Ice Cream for Perfect Crisps
After coating your ice cream balls, place them on a baking sheet lined with parchment paper and carefully freeze them for at least 2 hours, or until they’re solid. Freezing is vital to guarantee the coating options stick properly and form a crisp shell when reheated. During this time, the ice cream flavor will firm up, preventing melting when you add heat later. Use a sturdy coating, like crushed cookies or nuts, to achieve the best crunch. Avoid rushing this step, as a well-frozen core guarantees a crispy exterior and smooth, creamy inside. Keep the coated ice cream in the freezer until you’re ready to proceed. Proper freezing locks in the coating options, making your “fried” ice cream both delicious and mess-free. Additionally, employing wall organization systems can help keep your freezer space tidy and accessible for quick preparation.
Achieving the Fried Effect With a Hot, Non-Fat Method
You can create a crispy exterior on your ice cream without deep frying by using hot, non-fat techniques. These methods help you get that satisfying crunch while keeping the center cold and creamy. Let’s explore how to achieve this fried effect safely and deliciously. Incorporating sound design techniques such as crisp sound effects and layered textures can enhance the sensory experience, making your dessert feel even more indulgent.
Crispy Exterior, Cold Center
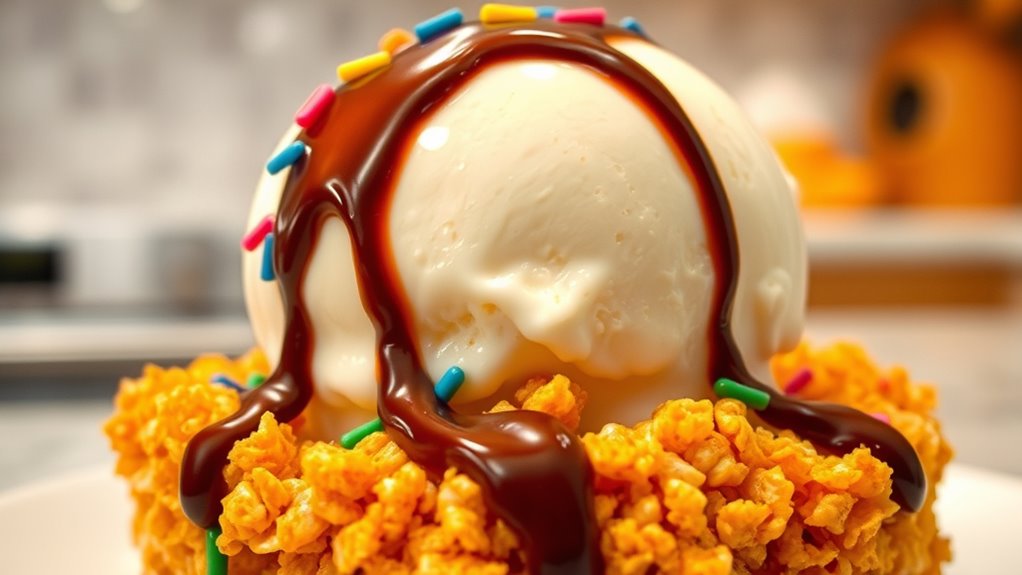
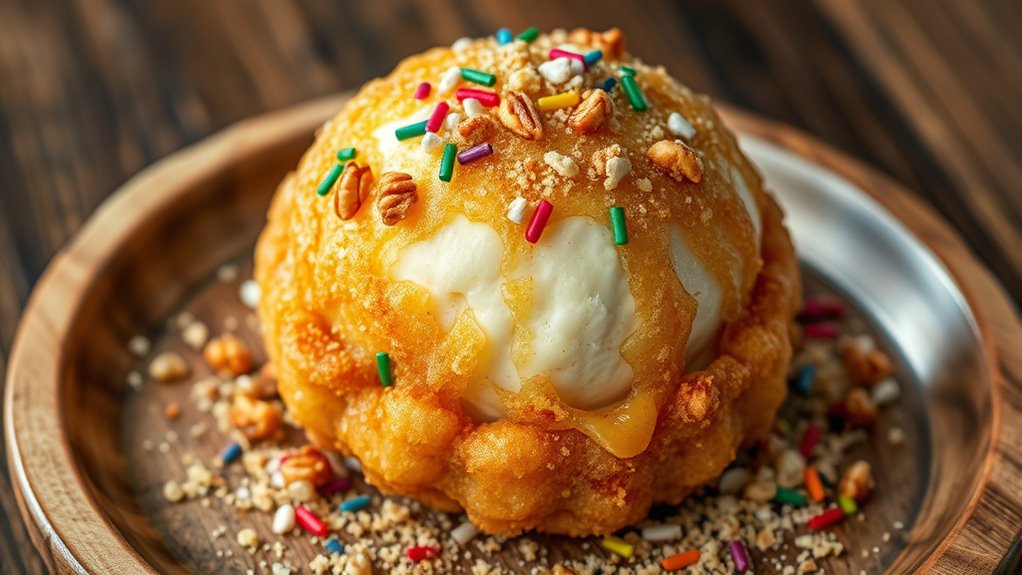
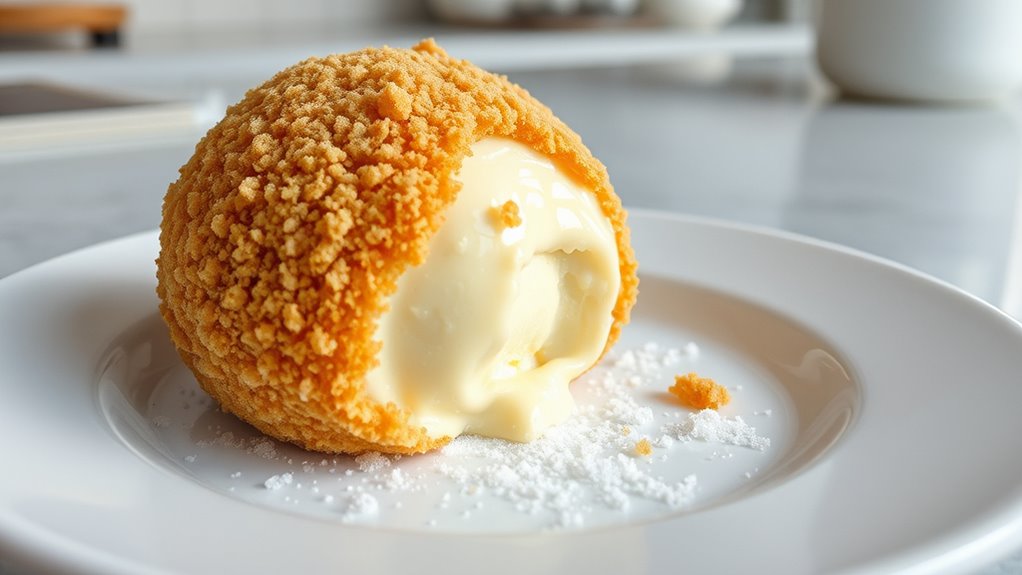
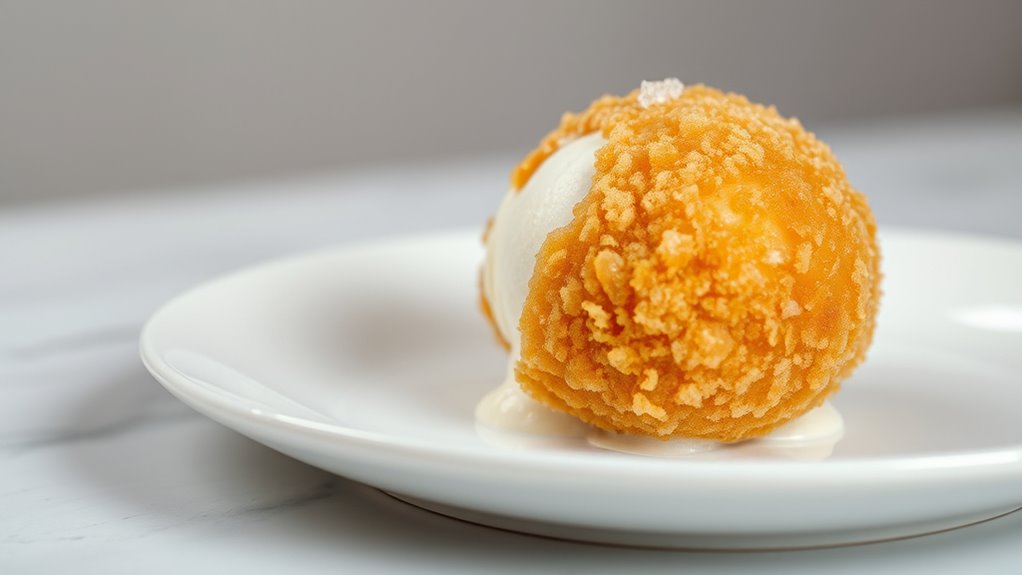
Achieving a crispy exterior while keeping the ice cream cold inside might seem challenging, but it’s possible with clever techniques that mimic deep-frying without the fat or mess. You can create a crunchy shell by coating your favorite ice cream flavors in a thick layer of crushed cookies, nuts, or cereal, then freeze it solid. When you briefly heat the coating, it crisps up quickly, sealing in the cold center. For serving suggestions, choose toppings like drizzles or fresh fruit that complement the flavor contrast. This method guarantees a satisfying crunch on the outside while maintaining the creamy, cold interior. Experiment with different coatings and flavors to customize your fried ice cream experience without the greasy mess of traditional frying.
Use Hot, Non-Fat Techniques
Use hot, non-fat techniques like broiling or using a torch, you can create a fried-like crust without any oil or deep frying. These methods quickly caramelize the coating, giving it a crispy texture that mimics fried ice cream. You can experiment with sauce alternatives, like flavored syrups or fruit coulis, to add different flavor variations that complement the crispy shell. For example, a drizzle of chocolate or caramel sauce enhances the overall experience. Using a torch allows precise control, quickly browning the coating without melting the ice inside. Broiling works well for larger batches, creating an even, golden crust. These techniques deliver the crunch and visual appeal of fried ice cream while keeping it healthy and mess-free. Additionally, understanding AI security principles can help ensure your kitchen devices are safe and protected from digital vulnerabilities during smart cooking.
Assembling and Serving Your “Fried” Ice Cream Treat
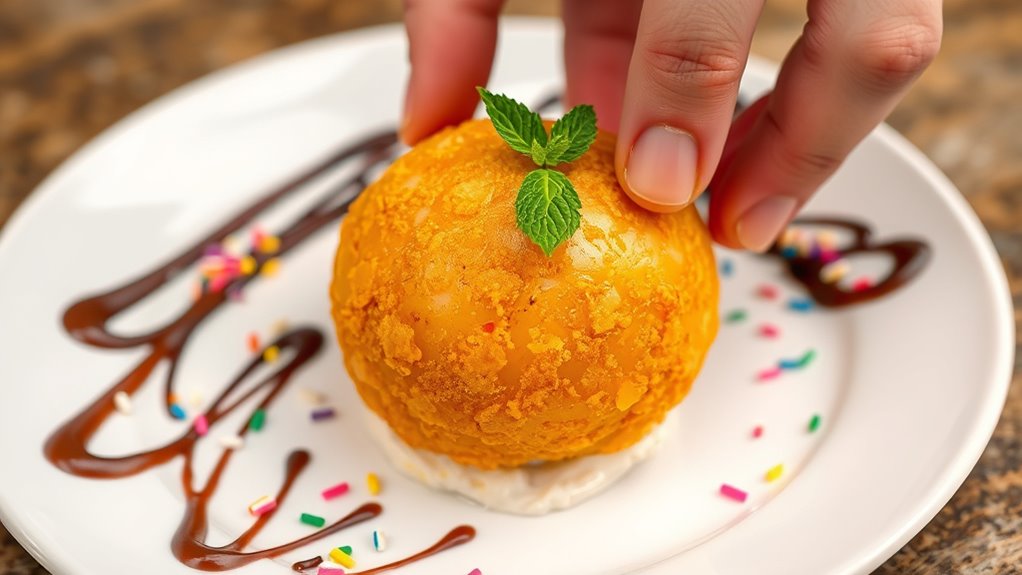
Once your ice cream balls are perfectly frozen and coated, it’s time to assemble and serve your “fried” ice cream. Start by placing each ball on a serving dish, then add your preferred toppings or sauces. To make your presentation eye-catching, consider creative ideas like drizzling caramel or chocolate, sprinkling crushed cookies or nuts, or adding fresh fruit for color and flavor. When choosing flavor combinations, think beyond traditional; try pairing vanilla with raspberry, chocolate with coconut, or coffee with caramel to impress your guests. Keep in mind these presentation ideas to elevate your dessert:
- Use contrasting toppings for visual appeal
- Serve on elegant plates or in mini cups
- Add a sprig of mint or edible flowers for a finishing touch
Adding a touch of rustic charm with farmhouse-style decor can also give your dessert display a cozy, inviting feel. These touches make your treat look as delicious as it tastes.
Tips for Maintaining Cleanliness and Safety During Preparation

To guarantee a safe and hygienic preparation process, always wash your hands thoroughly before handling any ingredients or utensils. Use clean cutting boards and utensils to prevent cross-contamination. Keep cleaning supplies nearby, so you can quickly clean spills or messes. Wearing safety gear like gloves and aprons protects you from splashes and hot surfaces. Use the table below to organize your safety measures:
| Safety Step | Recommended Action |
|---|---|
| Hand Hygiene | Wash hands before starting |
| Personal Safety | Wear gloves and apron |
| Workspace Cleanliness | Keep countertops clean and sanitized |
| Spill Management | Clean spills immediately |
| Equipment Safety | Use heat-resistant utensils |
Following these tips ensures a safe, clean, and enjoyable cooking experience. Additionally, maintaining proper kitchen hygiene practices can help prevent foodborne illnesses and ensure a healthier cooking environment.
Frequently Asked Questions
Can I Use Homemade Ice Cream Instead of Store-Bought?
You can definitely use homemade ice cream instead of store-bought options. Just guarantee your homemade ice cream is firm enough to hold its shape when coated and frozen again. Using homemade ice cream adds a personal touch and fresh flavor, but make sure it’s well-chilled beforehand. Store-bought options are convenient, but if you prefer homemade, just follow the same freezing and coating steps for perfect “fried” ice cream.
How Long Can I Store the Assembled “Fried” Ice Cream?
Your patience might be tested like a saint’s, but when it comes to storing fried ice cream, don’t go overboard. Usually, you should enjoy it within 1-2 days for the best texture and flavor. Follow proper freezing tips—wrap it tightly and keep it at a consistent temperature. Beyond that, the dessert risks freezer burn and sogginess, which aren’t worth the wait. So, indulge soon for the ultimate treat!
Are There Alternative Coatings for Different Flavor Varieties?
You’re wondering about alternative coatings for different flavor varieties. To customize your “fried” ice cream, try using crushed cookies, cereal, or nuts instead of traditional coatings. These options add unique textures and flavors, making each variety stand out. Simply dip your ice cream in a binding agent like egg wash or honey, then coat with your chosen alternative. Experimenting with different coatings lets you create a wide range of delicious flavor varieties.
Does the Method Work With Dairy-Free or Vegan Ice Cream?
Ever wondered if you can make fried ice cream with dairy-free options? Absolutely! You just need to choose vegan-friendly coatings that stick well and keep the ice cream intact. Dairy-free options like coconut milk-based ice cream work perfectly, and you can coat them with crushed cookies or nuts for flavor. With a little creativity, you’ll enjoy a delicious treat that’s both vegan-friendly and irresistibly crispy without any deep fryer mess.
What Are the Best Tools to Achieve a Crispy Coating?
When aiming for a crisp coating, you should focus on tool selection to achieve the best results. A shallow dish or plate works well for coating, while a wire rack helps prevent sogginess. Use tongs or a slotted spoon to handle the ice cream, ensuring even coverage. For extra crispness, consider a double-coating with crushed cookies or cereal, which enhances the texture and creates a deliciously crispy exterior.
Conclusion
Now that you’ve mastered the secret to creating crispy, “fried” ice cream without the mess, imagine the possibilities—crunchy, creamy delights waiting to be enjoyed. But wait, there’s one more twist that will elevate your treat even further. Are you ready to discover the final step that will leave everyone guessing? Stay tuned—you won’t want to miss what comes next in perfecting your homemade “fried” ice cream masterpiece.