
To make guilt-free air fryer onion rings, start by coating sliced onions with a healthy batter and seasoned flour, then add a crunchy breadcrumb layer for extra crispiness. Arrange them in a single layer in your preheated air fryer, lightly spritz with cooking spray, and cook at 400°F for 8-10 minutes, flipping halfway. This method cuts down oil and calories while keeping the flavor. Keep exploring for even more tips to perfect your healthy onion rings!
Key Takeaways
- Use a light batter and seasoned flour to maintain flavor while reducing oil content.
- Preheat the air fryer and avoid overcrowding to ensure crispy, evenly cooked onion rings.
- Lightly spray coated rings with cooking spray for added crispiness without extra oil.
- Opt for healthier coatings like almond flour or crushed oats for a guilt-free crunch.
- Rest cooked onion rings briefly before serving to set the coating and enhance texture.

Emeril Lagasse Extra Large French Door Air Fryer Toaster Oven Combo, 24 Cooking Functions and Digital Controls, 7 Accessories Included, Stainless Steel Finish, 26QT Capacity
A VERSATILE AIR FRYER AND MULTI-COOKER COMBO: Elevates practically any meal, from air frying quick after-school snacks to...
As an affiliate, we earn on qualifying purchases.
Recipe

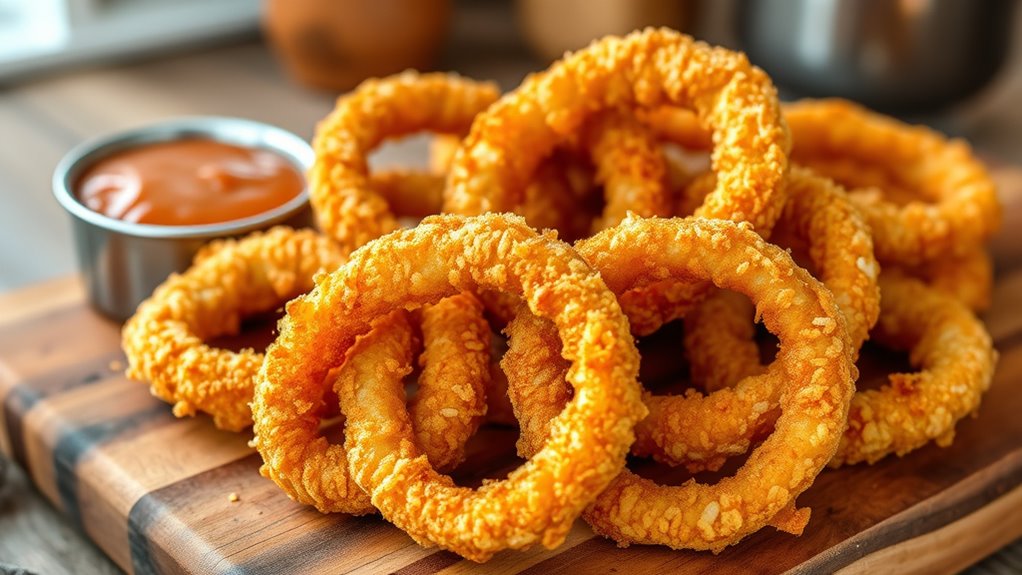
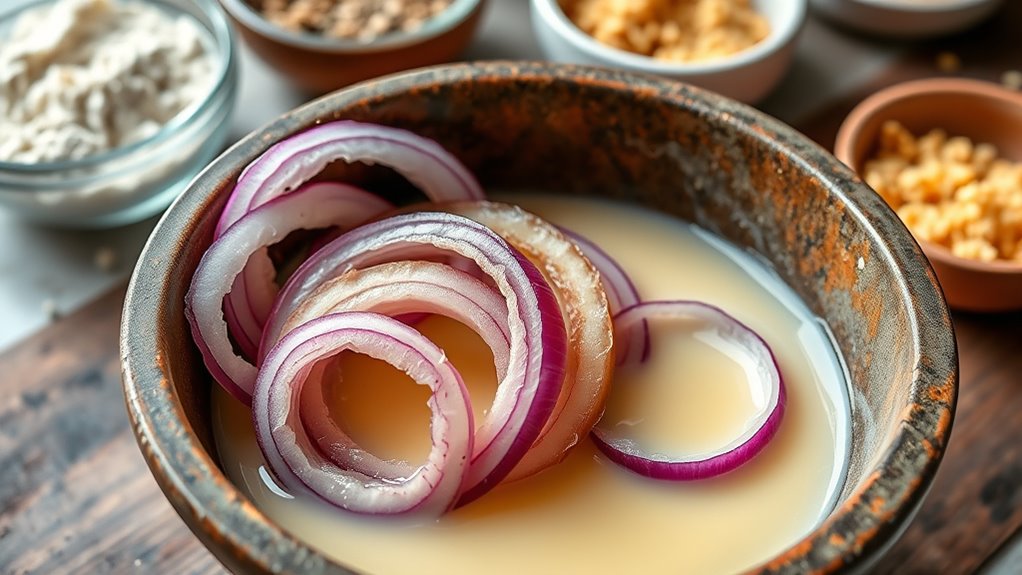
To make these guilt-free air fryer onion rings, start by peeling and slicing a large onion into ½-inch thick rings. In a shallow bowl, whisk together an egg and a tablespoon of milk to create the wet batter. In another bowl, combine one cup of whole wheat flour, a teaspoon of paprika, a pinch of salt, and pepper. For the crispy coating, prepare a mixture of one cup of panko breadcrumbs and a teaspoon of garlic powder. Dip each onion ring into the wet batter, then coat evenly with the seasoned flour mixture, followed by the breadcrumb mixture, ensuring each ring is thoroughly coated for maximum crispiness. Place the coated onion rings in a single layer in the air fryer basket, avoiding overcrowding to allow proper air circulation.
Peel and slice onion into rings, coat with seasoned flour and panko, then air fry until crispy.
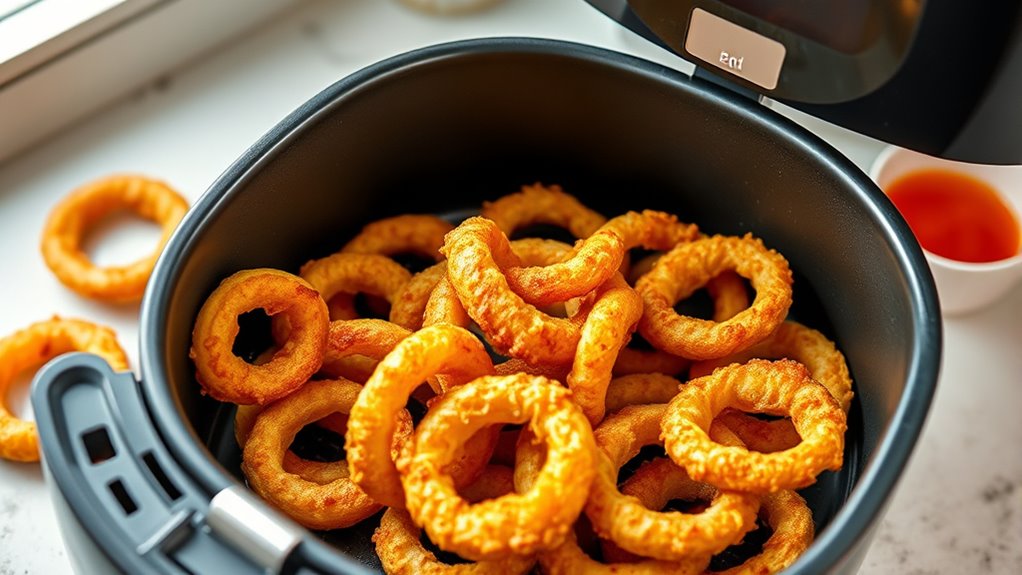
Preheat your air fryer to 400°F (200°C). Arrange the onion rings in the basket in a single layer, cooking in batches if necessary. Air fry for about 8-10 minutes, flipping halfway through, until golden and crispy. Keep an eye on them to prevent burning, adjusting the cooking time based on your air fryer model. Once cooked, remove the onion rings and serve immediately with your favorite healthy dipping sauce or a squeeze of fresh lemon for added flavor.
Ingredients:
- 1 large onion
- 1 large egg
- 1 tablespoon milk
- 1 cup whole wheat flour
- 1 teaspoon paprika
- Salt and pepper to taste
- 1 cup panko breadcrumbs
- 1 teaspoon garlic powder
Cooking instructions:
Preheat the air fryer to 400°F (200°C). Slice the onion into ½-inch rings, then dip each into the egg mixture, coat with seasoned flour, and then with panko breadcrumbs. Arrange the coated rings in a single layer in the air fryer basket, ensuring they are not overcrowded. Cook for 8-10 minutes, flipping halfway through, until crispy and golden. Remove and serve immediately.
Extra tips:
To enhance the crispiness, lightly spray the coated onion rings with cooking spray before air frying. For a healthier option, use almond flour or crushed oats instead of panko breadcrumbs. If your onion rings are not as crispy as you’d like, increase the cooking time slightly or add an extra spray of cooking oil. Always monitor the first batch to perfect your timing, as different air fryer models may vary. Serve with a homemade yogurt-based dip or a dash of hot sauce for added flavor.
CHEFMAN Multifunctional Digital Air Fryer+ Rotisserie, Dehydrator, Convection Oven, 17 Touch Screen Presets Fry, Roast, Dehydrate, Bake, XL 10L Family Size, Auto Shutoff, Large Easy-View Window, Black
Versatile countertop cooking: Air fry, bake, dehydrate, rotisserie, or roast to crispy perfection in one convenient appliance
As an affiliate, we earn on qualifying purchases.
Cooking Steps
To make perfect onion rings, you’ll start by dredging the onion slices in batter, ensuring they’re well coated. Then, you’ll apply a crisp batter coating before placing them in the air fryer. As they cook, you’ll watch them turn a beautiful golden brown and develop a crispy finish. Incorporating high-quality coating layers can also improve their overall crispiness and appearance. Using a lightweight vacuum to remove any excess moisture from the onions beforehand can help achieve a more even and crispy coating.
Step 1. Dredge Onions in Batter

Once your onions are sliced and ready, dip each piece into the batter, making sure they are fully coated. Hold the onion slice above the bowl, letting excess batter drip off before transferring it to the next step. Use a gentle, swirling motion to cover all sides evenly, avoiding thick globs that could cause uneven cooking. Make sure the batter adheres well but isn’t overly thick, which might make the onion rings heavy. If you notice any bare spots, dip the onion back into the batter briefly. Repeat this process for all slices, working quickly to prevent the batter from drying out. This step ensures a uniform coating that will crisp up nicely in the air fryer, delivering that perfect onion ring texture.
Step 2. Batter-Coated Onion Slices
After your onion slices are coated with batter, carefully place each piece into the air fryer, ensuring they are spaced out to prevent sticking. Arrange them in a single layer, not overcrowding the basket, so hot air can circulate evenly around each slice. Gently shake the basket or turn the slices halfway through cooking to promote uniform browning. Keep an eye on them as they cook, since batter-coated slices can brown quickly. Once they turn golden and crispy, remove them promptly to avoid overcooking. Handling them gently helps keep the batter intact. This step is vital for achieving that perfect texture—crispy outside and tender inside—without excess oil or mess. Proper spacing and gentle handling can also help prevent potential skin irritation, especially for those with sensitive skin. Additionally, maintaining a clean air fryer basket can prevent cross-contamination and ensure consistent results. Incorporating automation in kitchen appliances can further streamline your cooking process and improve safety. Being mindful of food safety practices can help prevent foodborne illnesses and keep your cooking hygienic. For optimal performance, choosing a high-quality Kia Tuning upgrade can enhance your vehicle’s handling and efficiency, just as proper preparation enhances your cooking results. Now you’re ready for the next step to finish your guilt-free onion rings.
Step 3. Crisp Batter Application

Carefully apply the batter mixture to each onion slice, making certain an even coating that covers all sides. Use a spoon or tongs to dip each slice into the batter, turning it gently to coat thoroughly. Let any excess batter drip off before placing it on a plate or tray. This step guarantees a uniform layer that will crisp up nicely in the air fryer. Avoid overloading the batter or applying thick layers, which can lead to uneven cooking. If some slices are difficult to coat evenly, gently pat them with your fingers to smooth out the batter. Take your time to ensure every onion slice is well coated; this ensures a crispy, golden exterior once cooked. Proper application here sets the foundation for perfect onion rings. Additionally, ensuring the batter has the correct paint viscosity helps achieve an even coat and optimal crispness. For the best results, make sure the batter is the right consistency to stick well without being too thick or runny, which can affect the overall crispiness and coating. Using a consistent coating technique ensures each onion ring develops a uniform and crispy exterior that enhances flavor and texture.
Step 4. Crisp Coating in Air Fryer
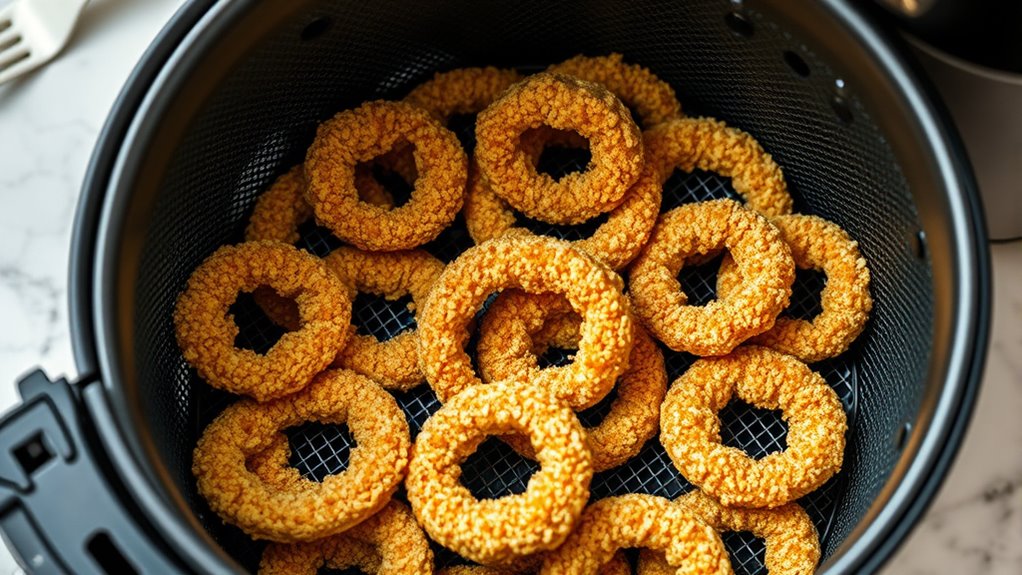
To achieve a perfectly crispy coating in the air fryer, place the coated onion slices in a single layer without overlapping. This allows hot air to circulate evenly, ensuring each piece gets crispy all around. Lightly spray or brush the coated onion rings with a bit of cooking spray; this enhances crispiness without adding extra calories. Avoid overcrowding the basket, as stacking can cause uneven cooking and sogginess. For best results, gently shake the basket halfway through cooking to promote even browning. Keep a close eye on the onion rings during the final minutes, as they can quickly go from crispy to burnt. Once they’re golden and crispy, remove them promptly to prevent softening. Proper spacing and gentle handling are key to achieving that irresistible, crunchy coating.
Step 5. Golden Brown Finish

Achieving a perfectly golden brown finish on your onion rings requires attentive timing and temperature control. Set your air fryer to 400°F (200°C) and cook the rings for 10-12 minutes, flipping halfway through. Keep an eye on them as they near the end of cooking to prevent over-browning. The rings should develop a crisp, even coating with a rich, golden hue. If they aren’t quite there after the initial time, add a few extra minutes, checking frequently. Remember, every air fryer varies slightly, so adjust the time as needed. Once they’re golden and crispy, remove them promptly to avoid burning. Rest for a minute or two before serving to let the coating set. This ensures a beautiful, mouthwatering finish every time.

Cosori 9-in-1 TurboBlaze Air Fryer 6 Qt, Premium Ceramic Coating, 90°–450°F, Precise Heating for Even Results, Air Fry, Roast, Bake, Broil, Dry, Frozen, Proof, Reheat, Keep Warm, 120V, Dark Gray
𝘼𝙞𝙧 𝙁𝙧𝙮𝙚𝙧 𝙐𝙥𝙜𝙧𝙖𝙙𝙚: Innovative TurboBlaze Technology delivers a powerful 3600 rpm fan speed and temperatures up to 450℉,...
As an affiliate, we earn on qualifying purchases.
History

The history of onion rings dates back to the early 20th century, when deep-frying sliced onions became a popular way to enjoy this versatile vegetable. They gained popularity in American diners and fast-food joints during the 1920s and 1930s. Originally, onion rings were simple slices dipped in batter or flour before frying, often served as a side or snack. Over time, recipes evolved with different batters and coatings, adding flavor and texture. Despite their long history, onion rings remained a comfort food, appreciated for their crispy exterior and sweet onion inside. Today, you’re exploring healthier ways to enjoy them, like using an air fryer, which offers a guilt-free twist on a classic favorite rooted in American culinary tradition.

Nuwave Bravo XL Pro Air Fryer Toaster Oven with Grill Combo, 2025 New Ultra-Fast Convection System, 35% Crispier, 2X More Even, 142 Presets, 50-500F, Smarter Probe, PFAS Free, 30QT, Stainless Steel
142 EASY-COOK PRESETS: The Bravo toaster oven countertop is equipped with 12 versatile cooking functions including air fry,...
As an affiliate, we earn on qualifying purchases.
Final Thoughts

Trying guilt-free air fryer onion rings is a smart way to enjoy a classic treat without the extra calories and fat. These onion rings deliver all the flavor you love with a healthier twist, making them perfect for snacking or sharing. By using the air fryer, you cut down on oil while maintaining that crispy texture. Plus, they’re quick to make, so you can satisfy your cravings without much hassle. Whether you’re watching your diet or just want a tasty snack, this recipe proves you don’t have to sacrifice flavor for health. Keep experimenting with seasonings or dips to customize your experience. Overall, guilt-free onion rings are a delicious, satisfying choice that fits seamlessly into a balanced lifestyle.
Frequently Asked Questions
Can I Use Sweet Onions Instead of Yellow Onions?
You can definitely use sweet onions instead of yellow onions. Sweet onions are milder and have a sweeter flavor, which can add a nice twist to your onion rings. Keep in mind, their softer texture might make them a bit more delicate when coating and frying. Just slice them evenly, and you’ll enjoy a delicious, slightly sweeter onion ring that’s perfect for your air fryer recipe.
What Dipping Sauces Pair Best With These Onion Rings?
Did you know that 65% of people prefer savory dips with onion rings? When choosing your dipping sauces, go for classics like ranch, honey mustard, or a spicy aioli to enhance their flavor. You might also try a tangy BBQ or a creamy blue cheese for variety. Pick a sauce that complements your onion rings’ crispy texture and savor every bite, making your snack even more irresistible.
How Can I Make Them Gluten-Free?
You can make onion rings gluten-free by swapping out traditional flour for a gluten-free alternative like almond flour, rice flour, or gluten-free all-purpose flour. Coat the onion rings evenly with your chosen flour, then dip them in beaten eggs and coat with gluten-free breadcrumbs or crushed cornflakes. Cook them in the air fryer until crispy. This way, you enjoy delicious onion rings without gluten, perfect for sensitive diets.
Are Air Fryer Onion Rings Suitable for Vegan Diets?
Thinking about your vegan diet, you might wonder if air fryer onion rings fit the bill. They can be vegan if you use plant-based ingredients like dairy-free batter and vegan-friendly breading. Just skip eggs and cheese, and opt for plant-based milk or aquafaba as binders. With a little tweak, these crispy treats can become a delightful, cruelty-free snack that satisfies your cravings without compromising your values.
How Do I Store Leftovers to Keep Them Crispy?
To keep your leftovers crispy, you should store them properly. Place the onion rings in an airtight container, but don’t stack them too tightly, as this can cause sogginess. For best results, reheat in the air fryer or oven to restore their crunch. Avoid microwaving, which makes them soggy. By following these steps, your onion rings will stay crispy and delicious for later enjoyment.