TL;DR
Moving your rig into a closet can drastically cut noise, but it needs proper ventilation and targeted treatment. Placement of panels and sealing gaps matter more than buying extra foam. With the right setup, a closet becomes a surprisingly effective recording space.
Ever tried recording in a tiny closet? It’s a mixed bag. On one hand, it’s a quick fix for noise and echo. On the other, it can turn into a sweaty, boxy echo chamber if not done right. This guide on acoustic dampening can help you optimize your space.
This guide cuts through the noise — literally. You’ll learn how to dampen sound effectively, where to place panels for maximum impact, and the one trick that turns a closet into a serious recording space without breaking the bank.
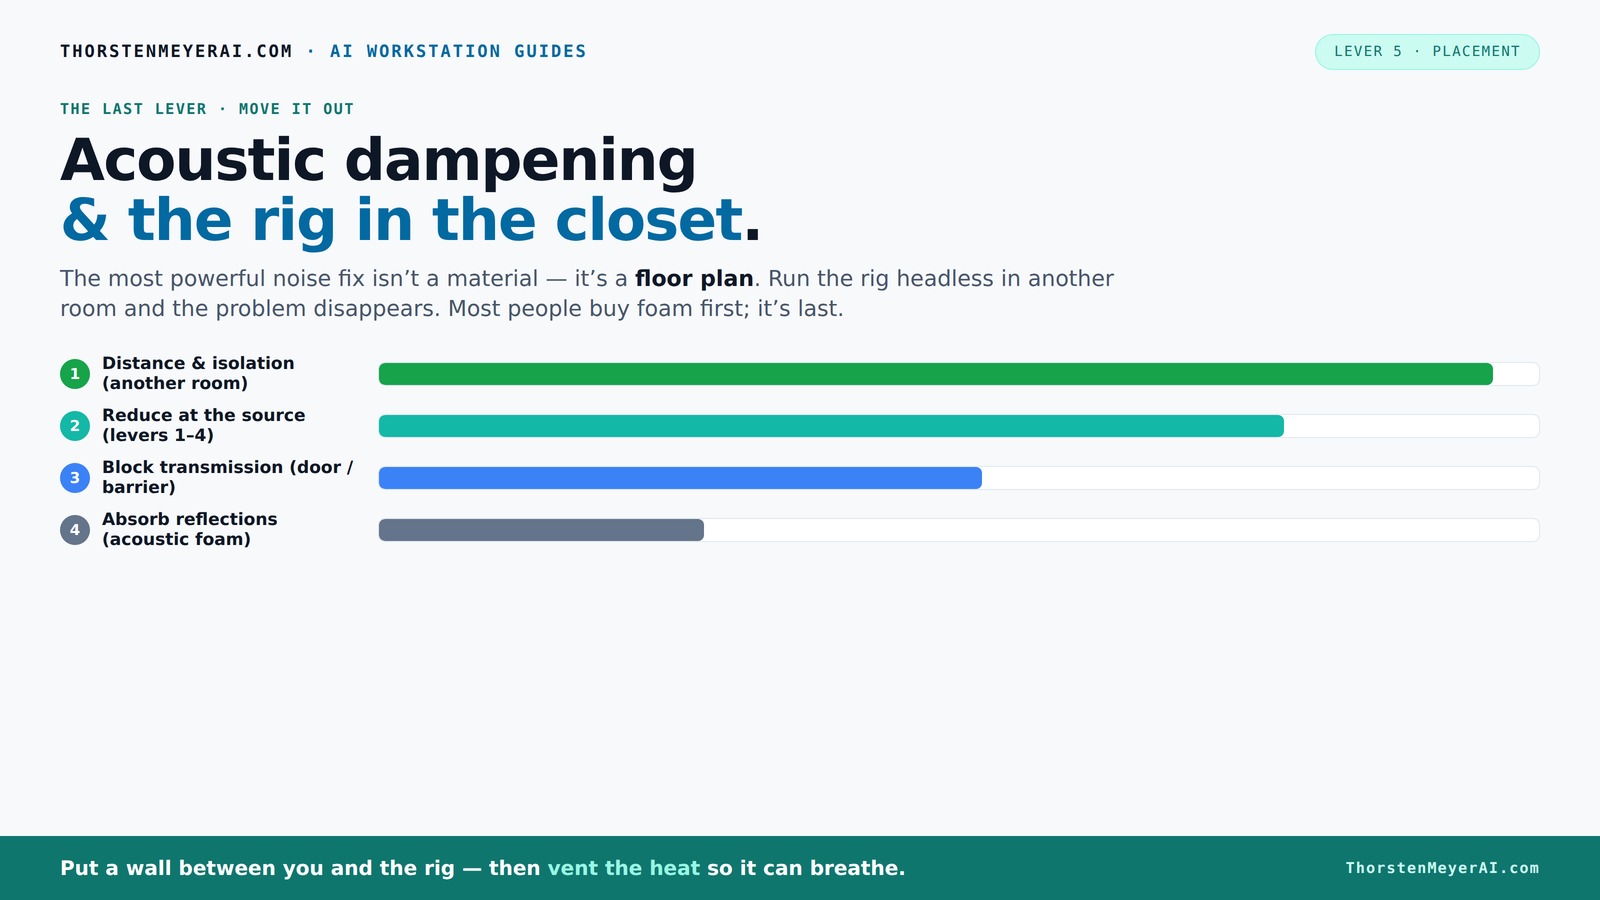
Acoustic dampening
& the rig in the closet.
The most powerful noise fix isn’t a material — it’s a floor plan. A rig you can’t hear because it’s in another room beats any amount of foam. Tap the approaches in Part 1 to see what actually works.
(another room)
(levers 1–4)
(door / barrier)
(acoustic foam)
Contain the noise, not the heat
Key Takeaways
- Moving your rig into another room often provides more noise reduction than acoustic foam or barriers.
- Ventilation is crucial — sealed spaces trap heat, risking hardware damage and throttling performance.
- Place panels at reflection points, especially on side walls and behind the mic, for maximum acoustic benefit.
- Bass traps in corners prevent low-end muddiness in small rooms and improve overall sound balance.
- Sealing gaps and adding dense barriers reduces sound leakage more effectively than foam alone. Sealing gaps can improve your sound isolation significantly.

Focusound 52 Pack Acoustic Foam Panels 1" x 12" x 12" Sound Proof Foam Panles Soundproofing Noise Cancelling Wedge Panels for Home Office Recoding Studio with 300PCS Double-Side Adhesive
- Soundproofing Design: Triangular grooves for noise absorption
- Includes Adhesive Tape: 300pcs double-sided adhesive for easy installation
- Easy Shape Recovery: Reforms after soaking in water
As an affiliate, we earn on qualifying purchases.
As an affiliate, we earn on qualifying purchases.
Why Moving Your Rig Is the Best Noise Solution You Can Find
Placing your high-powered AI rig in another room is by far the simplest way to cut noise. Think of it like this: a loud machine in another room doesn’t bother you, but one on your desk does. Moving it to a closet, basement, or spare room? Instant silence.
For example, I set my GPU mining rig in the basement. It’s loud enough to wake the dead, but in the closet with good ventilation? I barely hear it. The noise problem? Gone.
All you need is a reliable network connection and proper ventilation. That way, your rig can work hard without disturbing your workflow or peace of mind.
The 'Rig in the Closet' Setup — How to Keep It Cool and Quiet
Putting a hot, noisy rig in a closet sounds perfect — until it isn’t. The biggest trap? Trapped heat. A sealed closet can turn into a sauna, frying your hardware and throttling performance.
To avoid this, add ventilation — an exhaust fan, vents, or ducted airflow. Better yet, buy a purpose-built soundproof cabinet with temperature controls. This keeps your gear cool and quiet at the same time.
For instance, I used a small duct fan powered by a thermostat. When the temp hits a set point, it kicks on, pulls hot air out, and keeps everything running smoothly. No overheating, no noise, no fuss.
Placement of Acoustic Panels: Where and Why It Matters Most
Acoustic dampening isn’t just about buying foam panels. It’s about where you put them. The goal: reduce reflections at the reflection points — the spots your ears naturally pick up sound bouncing in the room.
Imagine standing in the closet; the sound bounces off the walls, ceiling, and door. The key is to target those hotspots with strategic placement.
Use the mirror trick: position a mirror on the wall, and move panels until you can’t see the speakers or mic in the mirror from your listening position. This method helps identify the most critical reflection points, which are often overlooked but significantly impact sound clarity.
For example, I placed panels at the first reflection points on the side walls and behind my mic. It cut echo and made my recordings sound clearer, even in a tiny space.
Bass Traps in a Closet? Yes, You Need Them
Bass buildup is the sneaky enemy in small rooms. Low frequencies tend to accumulate in corners, creating a boomy, uneven sound. So, yes — you should add bass traps in your closet.
Place them in the corners where walls meet the ceiling and floor. This is where low-end energy swirls and amplifies. Without bass traps, your recordings can sound muddy and unbalanced, especially when recording bass-heavy instruments or vocals.
For example, I installed dense foam bass traps in each corner of my closet booth. The difference? Much tighter, clearer vocals and a balanced low end that no amount of foam on the walls can fix alone. Bass traps help control these problematic frequencies, leading to a more natural, balanced sound that translates well across different playback systems.
Sealing Gaps and Using Barriers for Soundproofing
Soundproofing a closet isn’t just about adding foam. It’s about sealing cracks, gaps, and cracks around doors, vents, and panels. Dense barriers, like drywall with damping compounds, block more sound than foam alone.
Sealing gaps prevents sound leaks that can compromise your recording quality or disturb neighbors. I sealed the door gaps with weatherstripping and lined the walls with dense mass-loaded vinyl. The result? A noticeable drop in the sound leaking out, making my recordings and monitoring more private and clean. These barriers also reflect less sound back into the room, reducing internal echoes and improving clarity.
Combine sealing with acoustic treatment, and you get a mini soundproof studio that doesn’t wake up the whole house. The tradeoff is that proper sealing can be labor-intensive but pays off in significantly better sound isolation.
Choosing the Right Microphone for a Closet Booth
The microphone you pick can make or break your closet recording. Small spaces emphasize proximity and low-frequency issues, so a good mic choice helps tame those problems. Choosing the right microphone is essential for clear recordings.
Dynamic mics like the Shure SM58 or SM7B are great because they reject room noise and bleed, allowing cleaner recordings even with less treatment. Condensers, while sensitive, tend to pick up every echo and background noise in untreated or semi-treated spaces, making them less ideal unless you have extensive treatment.
For example, I switched from a condenser to a dynamic mic in my closet. The noise floor dropped significantly, and my recordings sounded much cleaner, even with minimal treatment. Microphone choice directly impacts how much room sound gets captured, which is critical in small, echo-prone spaces.
How Much Treatment Is Enough? The 20-40% Rule
You don’t need to cover every inch of your closet. About 20–40% coverage with targeted panels and traps usually does the trick. This range strikes a balance — enough to tame reflections and low-end issues without making the space sound dead or unnatural. This article on acoustic treatment explains the 20-40% rule well.
Imagine hanging a few panels at reflection points and stuffing some bass traps in the corners. This focused approach helps maintain a natural sound while controlling problematic frequencies. Over-treating can lead to a space that sounds unnaturally dead, which can affect the authenticity of recordings and make mixing more difficult.
For example, I used about 25% coverage — side walls, ceiling, and corners — and it transformed my recordings without turning the closet into a soundproof bunker. This balance preserves some of the room’s natural acoustics while still providing effective control over reflections and bass buildup.
Frequently Asked Questions
Is acoustic foam enough for a closet booth?
Acoustic foam alone isn't enough; it mainly reduces reflections. For effective soundproofing and low-end control, combine foam with sealing gaps, bass traps, and barriers, especially in small spaces.Where should I place panels in a small closet recording setup?
Place panels at the first reflection points on the side walls, behind the mic, and on the ceiling if needed. Use the mirror trick: move panels until you can't see the speakers or mic in the mirror from your position. Proper placement reduces unwanted reflections that can cause echo and muddiness, ensuring your recordings sound clearer and more natural.Do I need bass traps in a closet?
Yes. Bass traps in the corners help tame low-frequency buildup. Without them, your recordings can sound boomy or muddy, especially in small, enclosed spaces. Proper bass trapping ensures a balanced low end, which is essential for accurate recordings and mixing.How much of the closet should be covered?
About 20–40% coverage with panels and traps is usually enough. Focus on reflection points and corners, but avoid over-treating, which can make the space sound unnaturally dead and hinder the natural tone of your recordings.Should I treat walls, ceiling, or door first?
Prioritize treating reflection points on side walls and behind the mic, then seal gaps around the door and vents. Covering these key spots yields the biggest improvements in sound clarity and isolation, helping you get the most out of your small space.Conclusion
Turning a closet into a recording booth isn’t about perfect silence — it’s about smart placement, targeted treatment, and good ventilation. When done right, your closet transforms from a echo chamber into a professional-sounding space.
Remember: the best noise control often starts with moving your rig away. After that, treat reflection points and seal gaps. Your future self will thank you for the clear, crisp recordings that come from a well-planned setup.